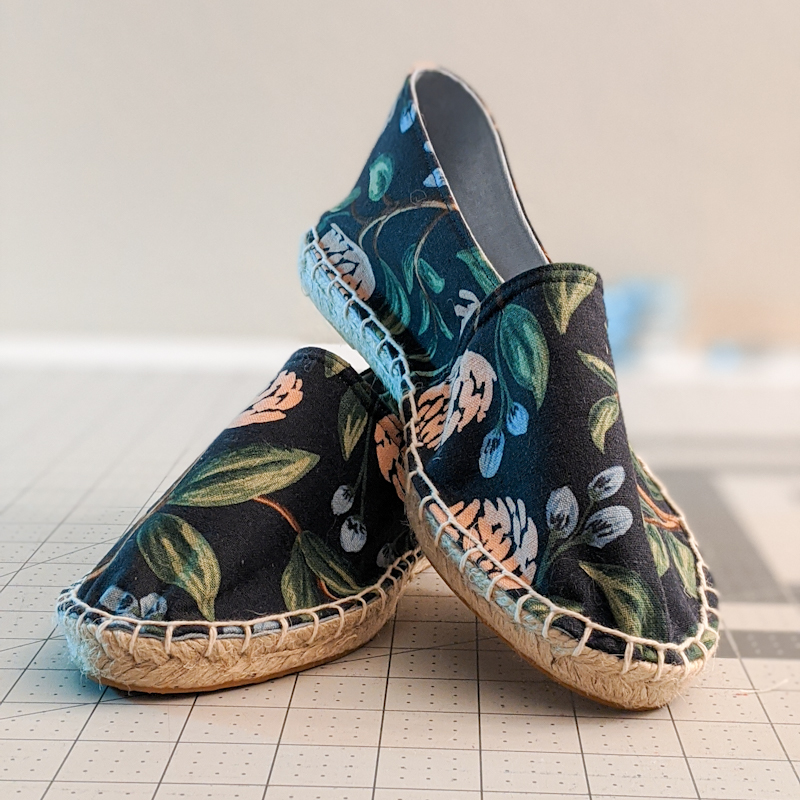
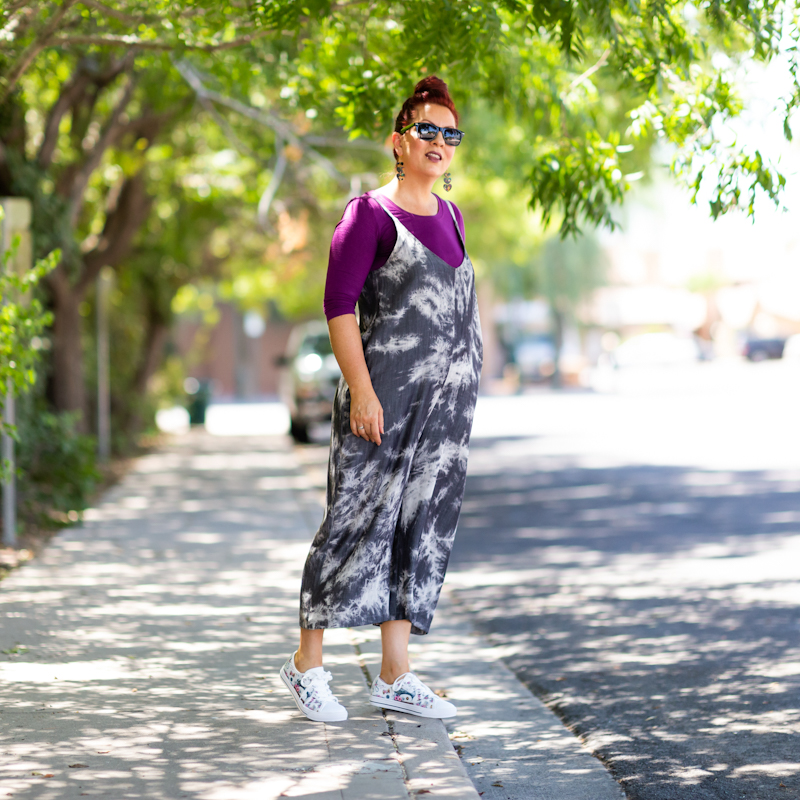
My Faux Jumpsuits

Anyone who knows me, knows I’m a pro at getting ready. It’s my job after all. I can do it in a little under 20 min; showered, dressed, hair and makeup. So I especially love simple outfits like jumpsuits. They make getting ready that much easier because there is less too pick out or worry about. Plus, when I’m having a day where I feel bloated or just kind of gross, I can throw on a jumpsuit and feel stylish but comfy. I don’t even think about stomach pooch or the cookies that I ate the day before. The only thing I really don’t like about a jumpsuit is wrestling my body in and out of it when I go to the restroom. I mean, I’m not as limber as I used to be so it can be a chore. On days that I really want the comfort of a jumpsuit but not the hassle, I reach for my faux pieces and no one knows the difference. Read more “My Faux Jumpsuits”

Nara Pants and Shorts by Coffee and Thread Patterns

Earlier this month I had the exciting opportunity to test a pattern for and independent company. It was the Nara Pants/Shorts by Coffee and Thread. The pattern designer is the sweetest lady named Olga Becker . I was so impressed with her kindness and I loved testing this pattern for her. She was super open to suggestions and critiques without taking offense. She is also really personable and does an excellent job making sure directions are clear and easy to follow

When Olga gave us the first tease on her Instagram of the Nara Pants I knew I had to try the pattern when it was ready. So when she posted for testers I immediately applied. I was so happy to be chosen.

There’s so many things about this pattern I love. Here’s the Deets: “The elastic waist allows for the most comfortable fit. View A has a flat front panel and an optional bow. View B includes an elastic waistband with optional belt loops and ties.”  Oh and I almost forgot. THEY HAVE POCKETS! Actual, usable front pockets that fit a cell phone. She did such an amazing job on this pattern.

The Nara Pants Pattern is designed for Woven fabrics with good drape. However, I made these in a stable cotton jersey knit from Girl Charlee Fabrics. It was a great fabric to use because the stretch was minimal so it sewed more like a quilting cotton only with better drape.

I do have to warn you though. Should you chose to sew the shorts version, total silliness might ensue. Such as:

Leg cocking while sticking your tongue out….

…total boss posing….

Or this….. I don’t know what’s happening. The shorts made me do it.

The Melody Dolman By Love Notions Sewing Patterns

It’s sad to admit that I was in my 40’s before I sewed myself a button front shirt. Its true. I really get intimidated by sewing button holes as well as sewing with woven fabric. Also, sleeve installation with woven fabrics always has me scratching my head. I can never seem to get it right. Knit fabric is what I prefer, particularly Ponte Knit. However,  this year I’m all about trying new things and amping up my wardrobe. Read more “The Melody Dolman By Love Notions Sewing Patterns”

Mom and Mini Matching Aprons

If given the opportunity to match my girlfriends for a whole night, I say yes every time. My husband and boys have no problem throwing on a tie or coordinating shirt to match me for Church or the occasional party. But to dress up in frills or ruffles and match a friend dressed the same doesn’t happen to me very often. So when my sweet friend asked my friends and I if we could help out in the kitchen for her daughters wedding, my answer was: “Only if we can wear MATCHING aprons.” Just kidding. We love helping at weddings. The matching aprons were just a sweet bonus. The mother of the bride bought the material and let me have free reign. So ruffles were really the only way to go. I mean if you have to wear an apron, you might as well look cute in it.

The aprons weren’t hard to make. Just a little time consuming to gather the ruffles. You can adjust these measurements to fit your size. Here’s how I made them.


These are the measurements I used for an adult apron in a size 8-10


These are the measurements I used for a kids apron size 6-8

Using the above measurements cut out all you pieces. Adult : 1 Back, 3 Ruffles and 1 Waist Sash. Kids: 1 Back, 4 Ruffles, 1 Waist Sash.

After you cut all the pieces, finish the edges to the backing with either a zig-zag stitch or a serger.

I used an old cotton table cloth I never used.

Next finish the edges of the ruffles using a zig-zag or serger. Then hem one long side 1/4″ on each one. This will be the bottom of each ruffle. The top side doesn’t need hemmed because it will be gathered.

I didn’t bother hemming the sides of the ruffles because I used a serger.  I just turned them under 1/4″ and ironed them. If you want to, you can turn the sides under 1/4 and stitch that. It’s gathered so it wont be super noticeable. It’s just preference.

On each ruffle, sew a basting stitch to the long side you didn’t hem and gather your ruffles. Or gather it in your preferred method.

 For the adult apron I placed a small dot on each side of the backing every 5 inches. I then drew a line attaching the dots so that I had a straight line to follow for attaching each ruffle. You can see it on the above picture. For the little girls apron I placed a dot every 3 inches on each side and drew a line to follow.  Attach each ruffle along each line making sure the top ruffle over laps the one under it 2-3 inches for the adult and 1-2 inches for the little girls.

Once all the ruffles are sewn on you are ready to do the sash.

For the waist sash I had to sew together two pieces of fabric of the same length to make it long enough. I just made sure that the seam was placed neatly in the middle front. I didn’t bother finishing the edges of the sash because they were all going to be enclosed.

Then, using and iron and steam I turned ALL the edges under 1/4″. Next I folder the sash in half and ironed again.

I marked the middle front of the apron and matched it to the middle front of the sash.

I pinned it in place right at the 1/4″  ironed edge of the sash.

I sewed the sash from one end to the next making sure to sew the ends of the sash closed.

You’re all done! Now repeat 6 more times and you have enough to give to your friends and their daughters.

4 tops, 3 bottoms, 12 different swimsuits!

For the past 3 or more summers I have just made do with whatever I could find to wear in the pool with my boys, ie.  running shorts, a sports tank, old miss-match swimsuits, old shirts and sports bras. You name it, I probably swam in it. I didn’t want not having anything to wear in the pool keep me from playing with my kids this Summer. I was determined that this would be the year I made my own swim suit. So I went to my favorite indie pattern companies and looked at some patterns. Read more “4 tops, 3 bottoms, 12 different swimsuits!”

A Pattern Every Little Girl Will Love!

A few weeks ago I had the pleasure of watching one of my  nieces for 5 days. I’m the sole girl in a house full of boys, so I jump at the chance to spend time with one of these darling girls. They know there will be swimming everyday, crafts, nail painting,  fun hairdos, trips to the dollar store, water park, and soda shop. And it’s pretty much a guarantee that they will go back home with a handmade item from Aunt Koe. Read more “A Pattern Every Little Girl Will Love!”